Configure the Network Audit Service
Overview:
Using the Network Audit Service you can remotely collect detailed hardware and software information about the machines on the networks you manage, and automatically store this information in the HelpSTAR database. The Audit Service makes use of the WMI (Windows Management Instrumentation) technology which is built into the Windows operating system, so you do not have to deploy any software on remote machines in order to audit them.
The Network Audit Service will scan the computers on your network to collect detailed hardware and software information for you.
To Audit the network machines, you first need to configure and Schedule the Audit Service from a HelpSTAR Windows client. When the scheduled time arrives, the Audit Service will start scanning the machines specified in the configuration. The Audit Service uses the NT service logon account to connect to remote machines and gather the hardware and software details using WMI. The collected data can be viewed under Discovered Items.
If you want to audit a local workstation, using the Web Portal, without delay, click the "Audit My Workstation" button on the My HelpSTAR home page (this action does not require the Audit service to be installed or running). Users can also Audit their workstations while they are logged into the Web Portal. In both cases, when the auditing is complete the results are displayed and saved in the database.
Installation
You can install the Network Audit Engine on your HelpSTAR database server, or on any machine that can connect to it.
Network Audit Engine Installation Prerequisites:
-
The Network Audit Engine must be run as a domain user that has administrative rights on the machines being audited. If Windows Authentication is used, this domain administrator must be authenticated to the database.
Network Audit Engine Installation:
-
On the server in which you want to install the Network Engine, navigate to the HelpSTAR Deployment Server folder (\HelpSTAR\HLPSTRCS\).
-
Click on the “Install.exe” file.
-
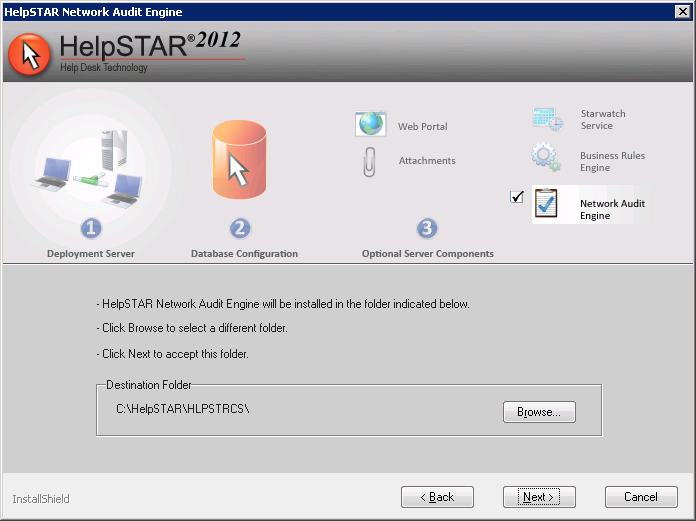
Check the Network Audit Engine option and click Next.
-
Specify the location in which Network Audit Engine files will reside. A default location will be provided (C:\HelpSTAR\HLPSTRCS). The location can be altered by clicking on the Browse button. In the location specified, the subfolder \Modules\AuditService will be created. Click Next.
-
You will be prompted to specify the domain account that this service will be run under.
-
A confirmation will appear upon successful completion of the Network Audit Engine installation.
-
Then go to Control Panel > Administrative Tools > Services > HelpSTAR Audit Service and right-click it. Go to Properties.
-
Select the Log On tab, then click the "This Account" radio button and enter the account name and password of a domain administrator, as shown below.

Requirements for different Operating Systems:
WMI is included when you install Microsoft Windows 2000, Windows XP, or Windows Millennium Edition (Me).
For those machines running Windows 95 OSR 2, Windows 98 or Microsoft Windows NT 4.0, a WMI installation package (WMI Core 1.5) can be downloaded from Microsoft at the following address: http://www.microsoft.com/downloads/details.aspx?displaylang=en&FamilyID=AFE41F46-E213-4CBF-9C5B-FBF236E0E875
*For configuring Microsoft Windows 9X machines – see section A below.
*For configuring Microsoft Windows NT 4.0 machines – see section B below.
*For configuring Microsoft Windows 2000/XP/2003 machines – see section C below.
A. Configuring Windows 9X machines
The following steps show how to configure the Microsoft Windows 95/98 machines on your network to be audited by HelpSTAR’s Network Audit Service.
Preparing Windows 9X machines for auditing
Step 1: Install the WMI Core 1.5 that you downloaded from
Microsoft.
Step 2: Install Microsoft DCOM version 1.3, which can be downloaded from following address:
http://support.microsoft.com/default.aspx?scid=kb;en-us;165101
Note that there are different downloads for Windows 95 and Windows 98.
In addition, you must also download the DCOM Configuration utility, which is required for configuring the DCOM once it is installed on a 9x machine.
You can download the DCOM configuration utility from following address:
http://download.microsoft.com/download/a/7/c/a7ce2686-05cc-47a9-baa0-b5fa75275fb1/dcm9xcfg.exe
Access Permissions
On the Windows 95/98 machine, you will need to grant access privileges that match the HelpSTAR Network Audit Service security credential supplied in the Audit Services’ "Log On" dialog.

For example, in the above screenshot we have configured the HelpSTAR Network Audit Service to run under the Domain Administrator account that is a member of the Domain admin group on the HSTRAINING.COM domain. Later we will grant access permissions for this group on the local Windows 95/98 machine.
Required Configuration for each Windows 95/98 machine:
-
Automatically Invoking WMI
The Windows Management service starts automatically on Windows NT/2000 machines, but not on computers running Windows 95/98. To set up the Windows Management service to start automatically on a Windows 95 or Windows 98 system, you must make the following changes to the operating system registry.
a. In the registry, navigate
to the value named EnableRemoteConnect?.
b. Under the key
HKLM\SOFTWARE\MICROSOFT\OLE, set EnableDCOM? to "Y" if it is not set to "Y"
already. "Y" is the default setting.
c. In the registry under the
key HKLM\SOFTWARE\MICROSOFT\OLE, set EnableRemoteConnect? to "Y". The default
setting for the EnableRemoteConnect? value is"N" for Windows 95/98 systems.
d. Place the following entry
in the registry to enable the WMI automatic start feature:
\HKLM\SOFTWARE\Microsoft\wbem\cimom - AutostartWin9X
e. Set the AutostartWin9X
value to either "1" or "2". The following table lists possible values for
AutostartWin9X and their meanings.
|
Value |
Meaning |
|
"0” |
Manual
Use this setting when you do not need the service running continuously. When a local request comes in, WMI starts to service the request. If you later restart the computer, the computer will start in manual mode (WMI will not start automatically).Note that remote startup requests are only supported on Windows NT or Windows 2000. Remote startup requests are not supported by COM on Windows 95 or Windows 98. |
|
"1” |
Automatic if the computer system needs to reload
Use this setting if you would normally have active event consumers. If WMI has active event consumers and the system (any system that supports WMI) needs to be restarted, WMI starts automatically after the system starts. |
|
"2” |
Automatic
Windows Management service always starts automatically. |
f. Add the file Winmgmt.exe to the computer's Startup directory. You can find this file in the \Windows\System\WBEM directory.
Configuring the workstation for user-level access
-
Go to the Control Panel and open "Network".
-
From the Access Control tab, select "User-level access control" and type the name of the security provider of your Network (i.e. the Domain Name, Workstation or Server which can authenticate the Windows 95/98 machine).

-
Reboot the workstation when prompted.
Configuring the DCOM to allow remote connections
By default,
DCOM is configured not to allow remote connections. You will need to change the
settings to allow remote connections. This can be done by using the DCOM
configuration utility, as follows:
a. Run the dcomcnfg.exe located under the %WINDIR%\System
folder.
b. Select the "Default Properties" tab.
c. Check "Enable Distributed COM on this computer".
d. Change "Default Authentication Level" to "Connect".
e. Change "Default Impersonation Level" to "Impersonate".
f. Then select the "Applications" tab.
g. Right-click on "Windows Management Instrumentation".
Select "Properties". This will open a new window.
h. Select the "Security" tab.
i. Select "Use custom access permissions" to configure the users who can access the machine remotely.
j. Click the "Edit" button, and grant access to the "Domain Admins" and "Enterprise Admins" of the domain group which was selected while configuring the HelpSTAR Network Audit Service "Log on" information.

k. Click "OK" and restart the Windows 9X workstation.
B. Configuring Microsoft Windows NT 4.0 for auditing
-
Install the WMI core 1.5 downloaded from Microsoft.
-
Because the default DCOM configuration does not allow remote connections, we must run the DCOM configuration utility to change the settings, as follows:
-
Run the dcomcnfg.exe located under the %WINDIR%\System folder.
-
Select the "Default Properties" tab.
-
Check "Enable Distributed COM on this computer".
-
Change the "Default Authentication Level" to "Connect".
-
Change the "Default Impersonation Level" to "Impersonate".

-
Click "OK" to save your settings.
C. Configuring Microsoft Windows 2000/XP/2003 for auditing
You should be able to audit Windows 2000/XP/2003 machines without any special configuration. If you experience problems auditing these machines, see the section on Troubleshooting Network Audits.
See Also:
Troubleshooting Network Audits