Configure User Email
Accounts
Overview:
This section allows the configuration of user account settings
for your reps. This will allow Support Reps to use the Email Inbox
functionality. This will also allow your reps to send email from their
local account when they are updating requests. In order to do this, an
administrator must configure the "User Email Accounts" settings. Note,
user email accounts can now be configured and reside on multiple mail
servers.
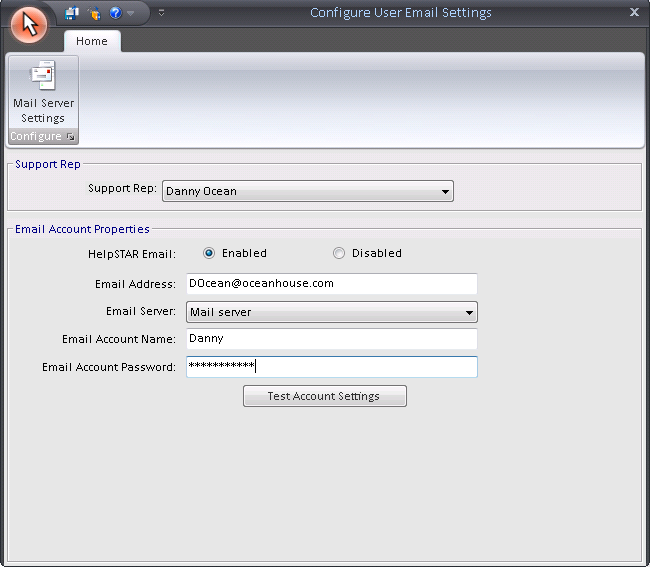
Mail Server Settings:

Click on the Mail Server Setting button to configure these
settings. These settings must be populated in order to edit Support Rep or
Email Account Properties.
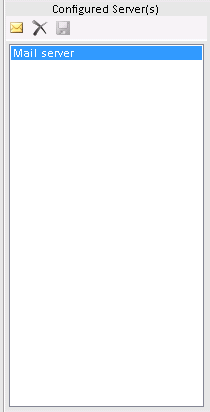
Configured Servers
If your Support Reps’ email accounts reside on separate mail
servers, add your mail servers by clicking on the e-mail icon.
Account Details
This section allows you to specify whether your email system
is using the POP3/SMTP, MAPI or IMAP protocol.
POP3/SMTP
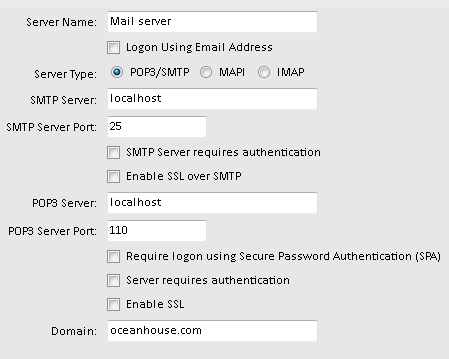
To Configure User Email Accounts using the SMTP/POP3 Protocol,
ensure the following fields are completed:
- Configuration Name: Name of the server the mail
account resides on
- Logon Using Email Address: If your mail server
requires authentication with an email address as opposed to a mail account
name, check this option.
- Server Type: Ensure the POP3/SMTP option is selected.
- SMTP Server: Enter the name for the server that is
used to process outgoing emails.
- SMTP Server Port: By default, this value will be
entered. However, if your organization has a different port configured,
enter the value here.
- SMTP Server requires authentication: If your SMTP
server requires authentication for outgoing emails, ensure this option is
checked.
- Enable SSL over SMTP: If the SMTP server uses the
Secure Socket Layer (SSL) protocol, check this option.
- POP3 Server: Entered the name for the server that is
used to process incoming emails.
- POP3 Server Port: By default, this value will be
entered. However, if your organization has a different port configured,
enter the value here.
- POP3 Server requires authentication: If your POP3
server requires authentication for outgoing emails, ensure this option is
checked.
- Enable SSL over POP3: If the POP3 server uses the
Secure Socket Layer (SSL) protocol, check this option.
- Domain: The domain in which the user email account
resides.
If the mail server requires login authentication, the HelpSTAR database must
contain a User Name and Password for each support rep wishing to email a request
history. You can enter this information in Email Account Properties. (Note that
support reps can also enter this information themselves from the Email node
found under My User
Options).
Microsoft Exchange Server (MAPI):
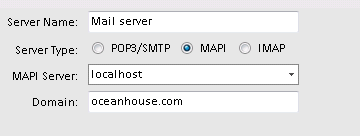
The administrator must enter in the MAPI server name. You can then select
each support rep’s profile in Email Account Properties (as discussed
below). Note that support reps can also select their profiles from the
Email node found under My User Options)
Note: if your mail system is MAPI, then the HelpSTAR mail server cannot
automatically send service request details from workstations having Outlook 2000
as the default email client while it is running. The email containing the
request details will remain in the outbox until Outlook 2000 is opened. (Note
also that Outlook 2000 does not send messages immediately when connected unless
this mail account option has been selected from Outlook’s Tools > Options
> Mail Delivery tab.)
IMAP
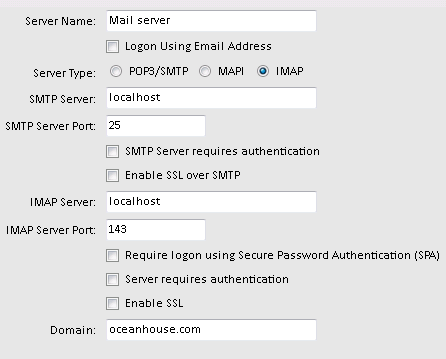
To Configure User Email Accounts using the SMTP/POP3 Protocol, ensure the
following fields are completed:
- Configuration Name: Name of the server the mail
account resides on
- Logon Using Email Address: If your mail server
requires authentication with an email address as opposed to a mail account
name, check this option.
- Server Type: Ensure the POP3/SMTP option is selected.
- SMTP Server: Enter the name for the server that is
used to process outgoing emails.
- SMTP Server Port: By default, this value will be
entered. However, if your organization has a different port configured,
enter the value here.
- SMTP Server requires authentication: If your SMTP
server requires authentication for outgoing emails, ensure this option is
checked.
- Enable SSL over SMTP: If the SMTP server uses the
Secure Socket Layer (SSL) protocol, check this option.
- IMAP Server: Entered the name for the server that is
used to process incoming emails.
- IMAP Server Port: By default, this value will be
entered. However, if your organization has a different port configured,
enter the value here.
- IMAP Server requires authentication: If your IMAP
server requires authentication for outgoing emails, ensure this option is
checked.
- Enable SSL over IMAP: If the IMAP Server uses the
Secure Socket Layer (SSL) protocol, check this option.
- Domain: The domain in which the user email account
resides.
Email Inbox Processing:

This drop-down menu (shown above) provides two options for message handling
in the Email Inbox, with respect to dragging messages to create or update
service requests:
- Paste email into current memo: The body of the
email will be inserted into the request memo field as plain text (along with
the header information). If there are any attachments or imbedded objects,
they will be ignored.
- Attach email to current memo: This is only available
in the Enterprise and Enterprise with Multi-Division editions of
HelpSTAR. Also, only if the attachment functionality has been enabled
(from the Database Utilities Installation). If this is the case, the header
information and first two lines (or 590 characters) of the body will be
inserted in the request Memo field, along with a "Click for details;"
hyperlink that will jump to the complete message (including any attachments).
Note that any objects imbedded in the email message will be ignored if your
mail system is MAPI.
Once settings have been configured, click on the Save icon to return to the
Support Rep window.
Support Rep Email Account Settings
After you have configured the Mail Server settings and Email Inbox message
handling, click the Save Icon. The window shown below will appear.

Here, you can enter your support reps’ local email account information. This
information may already be populated, as it can also be entered when adding a
user (from the Email section of the User Information: Logins tab), or it may be
entered by the support reps themselves from their personal User Options.
Click on Save to ensure changes are saved.
Back to
top
See Also:
Configure System Email Accounts
My User
Options
System
Options


